AFO 631 – Global change
631.1 Introduction
Global change is by far the most powerful method for modifying data within the system. The feature enables users to change all kinds of data in multiple records at one time.
Global change supports changes to the following data files:
· bibliographic records
· authority records
· borrower records
· holdings records.
Note
Global change for holdings records is managed through a separate AFO, “Global change holdings” (AFO 123) and is not further discussed in this section.
The system supports the following global change functions:
· replace data (change in (sub)field X “A” to “B”)
· transform data (these are typography changes, e.g. change in (sub)field X “a” to “A”)
· copy (sub)field (copy the content of (sub)field X to (sub)field Y)
· move (sub)field (move the content of (sub)field X to (sub)field Y)
· flip (sub)field (move the content of (sub)field X to (sub)field Y and the content of (sub)field Y to (sub)field X)
· delete (sub)field (delete (sub)field X from the record)
· add (sub)field (add (sub)field X to the record)
· order (sub)field (change the order of the (sub)field within the record; only for bibliographic records and authorities)
The 'replace data' function will also allow the user to append data to a (sub)field and remove data from a (sub)field.
631.1.1 Basic workflow principles [//]
The workflow is designed in such a way that it combines ease of use with a number of built-in security margins. Because this option offers the possibility to change all records in the database as part of one process, the effects of a faulty conversion can be extremely frustrating. In order to prevent these potential risks, the system contains a considerable number of safety measures that help to avoid some of the risks. These principles are described in this paragraph.
Principle 1: never run global change on the basic file, but always on a save list
The global change actions never run on a basic file (e.g. the borrowers) but on a save list that contains a selected number of records (e.g. borrower records). This gives the user an extra layer of security (if his action does not produce the expected result, he always knows exactly which records are involved).
Principle 2: define the work that needs to be done in a profile
Multiple global change profiles can be defined that can be re-used at any time. The profiles contain a list of the data that needs to be changed (e.g. change every “A” to “B” in field XXX). Note that one profile can contain changes to multiple fields or subfields.
Principle 3: offer multiple change methods and allow dummy changes
The system distinguishes between three types of changes:
· dummy conversion: imitates the conversion process, but does not actually execute any conversion (i.e. the records remain unchanged, but one can review the expected result, in an attempt to reveal errors in the conversion profile without running the risk of actually making the modifications to the files);
· without confirmation: converts the records in the save list;
· with confirmation: converts the records in the save list and requests a confirmation per record.
Before actually performing the conversion, you can use the ‘dummy conversion' to reveal errors in the conversion table, without running the risk of actually making the modifications to the files. We recommend that you run dummy conversions until the conversion is completely correct.
The option ‘With confirmation' is quite suitable for converting a small number of descriptions/objects. Given that the system requests confirmation per record, this option is not suitable for converting a large number of records.
Principle 4: provide reports and other control functions
Each global change type produces a report with the results of the action, allowing the user to review the effects of his conversion.
Principle 5: “uniformity” of testing
After a record has been modified by global change, the system performs a number of record checks. In principle, these tests are identical to those that are applied if a record is modified in regular editing mode.
So if you change an authorised (sub)field in a bibliographic record in such a way that it changes to a form that should not be used in a record (e.g. the rejected form) you will get an error message and the change will not be performed.
The same principle should also insure that you cannot change an authority record in such a way that it's normalised form would identical to another authority record. This should also generate an error message.
631.1.2 Explanation of rules[//]
Rule type
Each rule has a type (replace, transform, move, etc.) that defines the type of global change that will be executed.
Rule processing order
In two cases, the rule order in the profile is of great importance. These cases are:
1. if the rule type is “Replace” (replace string “A” by string “B”)
In these cases the following applies. For each record in the save list, the rules in the profile are evaluated one after each other, until a rule that applies is found. If a valid rule is found, processing for the (sub)field stops and the system moves to the next (sub)field in the record. By consequence, it is relevant (if possible) to store the rules that are most likely to be valid at the beginning of the global change profile, as it will improve performance.
Let's assume there are four rules, 1 - 2 - 3 - 4. These are evaluated in that order.As soon as a rule applies ( = TRUE ), the system will executed the associated global change and QUIT evaluation of the rules.
Example: rule 3 is the only one that is TRUE. In that case the system will evaluate 1 (not true), 2 (not true) and 3 (true and quit). So 4 is never evaluated.
or
2. if one or more restrictions are attached to the rule (see below for more information on restrictions).
The system evaluates the rules in the profile sequentially. If restrictions are attached to a rule, the restrictions are evaluated. If the outcome of the evaluation is positive, the system will execute the rule and stop processing the (sub)field. If the outcome of the evaluation is negative, the system will move to the next rule, until it finds a rule that can be executed or until the end of the profile is reached.
If no restriction is attached to the rule and if the rule type is not “replace”, the rule order is not relevant, as it will be executed anyhow.
Rules are processed in sequential order. Smart ordering of the rules can, as mentioned, improve performance significantly. However, as you can truncate data, it is extremely import that rules are ordered correctly to achieve the desired result. If truncated strings are used, the sequence of the conversion criteria in the conversion table should always be from specific to general.
Note that rules and restrictions are always applied to the record as it is stored in the system before global change accessed it. This processing method has been selected to assure that Global Change does not do successive changes on a record.
The evaluation is per record in the savelist. So "if the rule applies" is evaluated for each individual record within the savelist.
Example:
You want to convert all strings that begin with 399 to strings that begin with RED 399 and you want to convert all strings that begin with 39 convert to strings that begin with GREEN 39. To get the system to do this you define a profile with the following rules:
·
define a profile with the following rules:
Change 399@ to RED 399@
Change 39@ to GREEN 39@
·
Do not start the profile with the rule “39@ à GREEN 39@”. If the system performs this conversion first, it will never find the pattern “399”, because that will already have been replaced with “GREEN 39”.
·
To be able to replace both patterns correctly you must enter the most specific search command as the first line of the conversion table: thus “399@ à RED 399@”.
Restrictions
Furthermore, restrictions can be applied to each rule. These restrictions allow you to define one or more restrictions for each rule.
An example of such restrictions is e.g.: you want to add a field to a set of borrower records, based on the content of another field. You would achieve this by taking the following steps (note that these are very high level steps):
1.
Store the borrower records in a save list.
2.
Define a global change profile that contains a number of rules that each has a restriction attached to them.
Example:
|
No. |
Rule |
Restriction |
|
1 |
add field X with value ABC |
only if field Y = 123 |
|
2 |
add field X with value DEF |
only if field Y = 124 |
|
3 |
add field X with value GHI |
only if field Y = 125 |
|
4 |
add field X with value JKL |
only if field Y = 126 |
3. Apply the profile to the save list.
The result of this action would be that field X is added to the records. If field Y has a value of 123, field X will get the value ABC; if field Y has a value of 124, field X will get the value DEF, etc.
In principle, all data elements that belong to the file (bibliographic, authority or borrowers) that is being processed can be used for restrictions. It is not possible to use data elements from other files than the one that is being processed.
Note
Blocked records are never processed by the global change routine.
Rule groups
In most cases the functionality offered by the rules and restrictions on rules will be adequate but in those cases where the user needs more control over the actions a global change profile will perform the system allows the use of rule groups.
Note
The use of rule groups is optional. If a user does not define rule groups all rules are part of a virtual rule group called 'general'.
The use of rule groups will allow the user to specify a relation between different rules in a global change profile. Examine the following global change profile.
|
No |
Rule |
Rule group |
Restriction |
|
1 |
add subfield 700/$a with value Asimov |
n/a |
only if 700/$a is not equal to Asimov |
|
2 |
add subfield 700/$b with value I. |
n/a |
|
|
3 |
change order of field 700 to first in record |
n/a |
|
|
4 |
add field 690/$b with value JKL |
n/a |
|
This example implies a (conceptual) relation between the first three rules, namely that rule 2 and 3 should only be executed if rule 1 is executed and those rules should only be applied on the field added by rule 1.
The relation between those three rules is that the profile should add an author field (tag 700) with Asimov as last name (subfield $a) and I. as first name (subfield $b) and show that tag as the first tag of any record it's added to.
The rule groups allow you to specify such a relation between rules. In this example the first three rules should be in the same rule group.
The fourth rule is another addition (tag 690, subfield $b) to any record. This rule has no (conceptual) relation to the other rules. In this example this rule is part of the 'general' rule group.
In this case you should define the profile as show here. Note that the rule group called 'Add author tag' is just an example.
|
No |
Rule |
Rule group |
Restriction |
|
1 |
add field 690/$b with value JKL |
n/a |
|
|
|
Add author tag [group 1] |
|
|
|
2 |
add subfield 700/$a with value Asimov |
1 |
only if 700/$a is not equal to Asimov |
|
3 |
add subfield 700/$b with value I. |
1 |
|
|
4 |
change order of field 700 to first in record |
1 |
|
Specific notes for bibliographic records global changes
Subfields that are pointers to other records (either authority links or bibliographic links) cannot be used in a replace rule.
Subfields that contain data coming from other bibliographic records (e.g. subfields of the type 'reference slave') cannot be used in global change.
The following criteria from the "Technical" node of a bibliographic record can be used in a replace rule:
· Deletion permitted
· Include in index
· Modification permitted
· Publication type
· Record status
· Template last used
All other criteria from that node cannot be used in global change.
Logical elements and groups cannot be used in global change.
Specific notes for authority records global changes
Subfields that are pointers to other authority records cannot be used in a replace rule.
The following criteria from the "Technical" node of an authority record can be used in a replace rule:
· Deletion permitted
· Include in index
· Modification permitted
· Record status
· Template last used
All other criteria from that node cannot be used in global change.
Logical elements and groups cannot be used in global change.
Specific notes for borrower records global changes
In general all (sub)fields which are interactively activated/defined through AFO 482->
Borrower definition settings should be available for global change.
The following (sub)fields are an exception to that rule and are not available for global change:
· bar code of borrower
· related borrower bar code
· back link related borrower bar code
· relation type of related bar code
· back link relation type of related bar code
· institution code
· location code
· borrower category
· membership registration date
· membership last renewal date
· membership due date
· membership type
· missing card : system note
· outstanding membership fee
· name and surname (the automatically created forms based on data entered in last name, first name, etc. subfields).
After choosing this AFO a submenu is displayed:

Each option is described in the following sections.
631.2 Conversion profile maintenance
After choosing this option, the following screen is displayed:
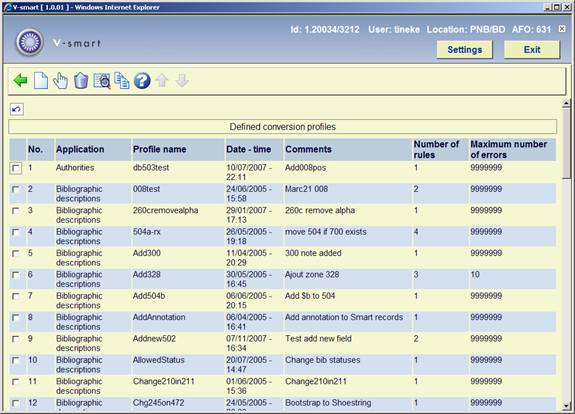
Options on the screen
: Select this option to create a new profile. See section 631.2.1.
: Select a profile an then this option to look at the rules. See section 631.2.1.
: Select a profile and then this option to delete it. The system will ask for confirmation.
:Select a profile and then this option to modify the general properties (name, comments, number of errors).
:Select a profile and then this option to create a new profile based on characteristics of the selected profile. A form is displayed which allows you to define a new profile name and comments.
631.2.1 Create new profile
: Select this option to create a new profile. After choosing this option an input form will be displayed:
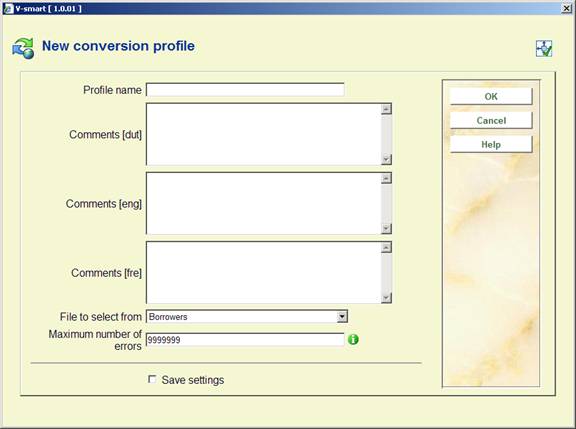
Fields on the screen
Profile name: Enter the name of the profile. The maximum length of the profile name is 30 characters. A profile name cannot exist of only punctuation characters.
Comments: Enter a description for each language. This comment can have a maximum length of 100 characters.
File to select from: Select the file to select the data elements from for this profile.
Maximum number of errors: Specify the number of errors, which will cause the execution of the profile to be halted if it is exceeded.
After you have submitted the form, the system takes you to the detail screen of the global change profile:

Options on the screen
: To create a new rule, the system uses a wizard that will guide you through the rule creation process. See paragraph 631.2.2 for more details about this wizard.
: If you select a rule, the system shows you the parameters that are attached to the rule. You cannot change the rule type. If you want to change the rule type, you have to delete the rule and add a new rule with a different type. If you want to change / view the restrictions for the rule, you have to use the button.
: The system will ask you for a confirmation. If you confirm, the rule will be deleted and the rule numbers will be recreated.
: You can modify the general properties of the profile as described for the same option mentioned in paragraph 631.2 above.
: To move a rule in the list, follow these steps:
1. Select the rule that you want to move to another position in the list.
2. Click on the button.
3. The system displays a form that allows you to indicate to what rule id you want to move the selected rule id. The selected rule will be moved to the position that you indicate and the rule numbers will be recreated.
: Select a rule and then this option to view/modify the defined restrictions or add new restrictions. See paragraph 631.2.3 for more information.
: Select one or more rules from the 'general' group and click this button to add them to a (new) group. See paragraph 631.2.4 for more details.
: Select one or more rules from a group and select this option to put the selected rules back in the 'general' group and the rule numbers will be recreated.
If a group does not contain rules when the user leaves the rules overview screen the group is deleted automatically and the group numbers will be recreated.
: Select any rule from group and select this option to change the properties of the group.
: Select a rule and then this option to copy the restrictions form this rule to another. The system will present a list of rules to copy to.
631.2.2 Create new rule wizard
: To create a new rule, the system uses a wizard that will guide you through the rule creation process.
To create a new rule, the system uses a wizard that will guide you through the rule creation process. This process consists of a number of steps; the actual number of steps depends on the rule type (in almost all cases there are two steps).
Note
All forms of the Wizard process have the following buttons (if appropriate): , and . The first form does not have the button. The last form does not have a button but a button. If the button is activated, the process is terminated. The system will ask for a confirmation.
Wizard Step 1 – Select the rule type
Select the appropriate rule type from the list of available types.
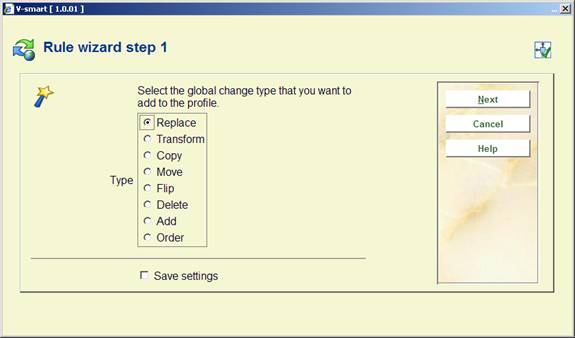
Depending on the selection step 2 will offer different options.
Wizard Step 2 – Replace data
Select to which data element the rule has to be applied and which data string has to be replaced by which other one.

The button "" allows the user to select a valid option from data elements, which point to an authority list. The button "" allows the user to see details about a data element.
You can use the Replace type to remove parts of data from a field and to append data at the end or at the beginning of a field. The following table explains these specifics.
|
From |
To |
Explanation |
Example of change (input is ABCA) |
|
A |
B |
String A will be replaced by string B |
BBCB |
|
A@ |
B@ |
String A will be replaced by string B if the string begins with A |
BBCA |
|
@A |
@B |
String A will be replaced by string B if the string ends with A |
ABCB |
|
@ |
A@ |
Append the string A at the beginning of the string |
AABCA |
|
@ |
@A |
Append the string A at the end of the string |
ABCAA |
|
A |
|
Replace the string A with nothing |
BC |
|
A@ |
|
Replace the string A at the beginning of the string with nothing |
BCA |
|
@A |
|
Replace the string A at the end of the string with nothing |
ABC |
|
\@ |
* |
Replace the character “@” by a star; if the “@” (add-sign) character is preceded by a “\” (backslash), the system no longer interprets it as the truncation character, but as a regular character |
ABCA [no change as the string does not contain the @ character] |
|
* |
\@ |
Replace the character “*” by an add-sign; if the “@” (add-sign) character is preceded by a “\” (backslash), the system no longer interprets it as the truncation character, but as a regular character |
ABCA [no change as the string does not contain the * character] |
Both “From” and “To” data strings cannot contain more than one add-sign.
The @ character (add-sign) is used as the truncation character. If one wants to “global change” the add-sign as a character (and not as the truncation indicator), it should be preceded by the backslash (\).
Note
All examples in the previous table are case sensitive.
Wizard Step 2 – Transform data
Select to which data element the rule has to be applied and which transformations must be applied, and in which order they must be applied.

The button "" allows the user to see details about a data element.
The following transformations can be used:
· all to uppercase
· all to lowercase
· first character uppercase
· each word - first character uppercase
· remove all but numeric characters
· remove all punctuation
· translate all punctuation to (nothing)
· translate all punctuation to . (a dot)
· translate all punctuation to – ( a dash)
· translate all punctuation to blanks
· remove all blanks
· remove articles
· remove all stop words
The list of valid transformations is identical to the list that is available in AFO 482 and 469.
Wizard Step 2 – Copy (sub)field
Select the (sub)field that has to be copied and the (sub)field to which it should be copied.
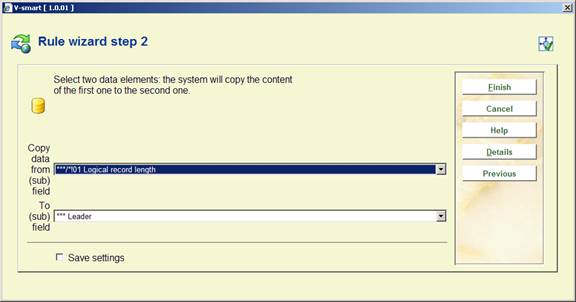
The button "" allows the user to see details about a data element.
Both data elements (“from” and “to”) have to be of the same type, i.e. both have to be either fields or subfields. The “From” and “To” data elements cannot be the same data element.
Wizard Step 2 – Move data
Select to which data element the rule has to be applied by selecting the (sub)field that has to move and the (sub)field to which it should be moved.

The button "" allows the user to see details about a data element.
Both data elements (“from” and “to”) have to be of the same type, i.e. both have to be either fields or subfields. The “From” and “To” data elements cannot be the same data element.
Wizard Step 2 – Flip data
Select the two fields of which the content has to be flipped.
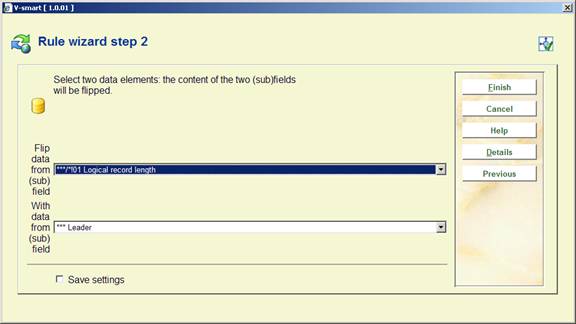
The button "" allows the user to see details about a data element.
Both data elements (“from” and “to”) have to be of the same type, i.e. both have to be either fields or subfields. The “From” and “To” data elements cannot be the same data element.
Wizard Step 2 – Delete (sub)field
Select to which data element the rule has to be applied. The (sub)field will be removed from the record.
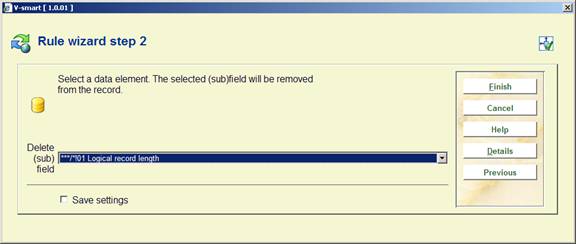
The button "" allows the user to see details about a data element.
Wizard Step 2 – Add (sub)field
Select a data element and define a data string. The (sub)field will be created and will contain the defined data string.

The button "" allows the user to select a valid option from data elements, which point to an authority list and. The button "" allows the user to see details about a data element.
Wizard Step 2 – Order (sub)field
Select the data element to change the order of within the record.
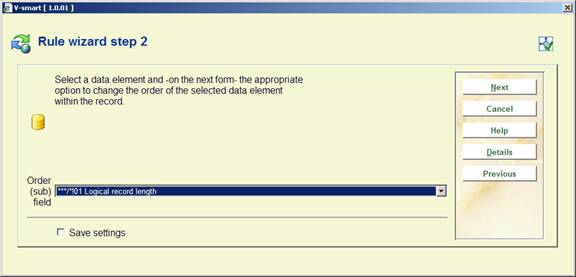
The button "" allows the user to see details about a data element.
This is the only option that offers a step 3 for the wizard:
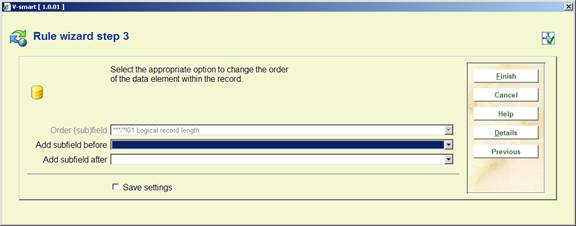
Select the action appropriate for the selected data element to specify how the order of the data element should be changed within the record.
If the selected data element is a field, there will be:
· a dropdown list containing all fields from the format and the extra option 'the start of the record" ["Add field before"]
· a dropdown list containing all fields from the format and the extra option 'the end of the record" ["Add field after"]
If the selected data element is a subfield, there will be:
· a dropdown list containing all subfields of the field specified in the selected data element and the extra option 'the start of the record" ["Add subfield before"]
· a dropdown list containing all subfields of the field specified in the selected data element and the extra option 'the end of the record" ["Add subfield after"]
631.2.3 View/modify restrictions for a rule
: If you activate the view restrictions for a rule button, the system navigates to the restriction overview screen.
The restriction overview screen is largely identical to the SSP selection profile screen as used in AFO 141->selections.
Above the list of defined restrictions for the selected rule the system shows the Boolean relationship between the restrictions. For each restriction the following data is shown: criteria, operator, data type, variable, value and exact value.
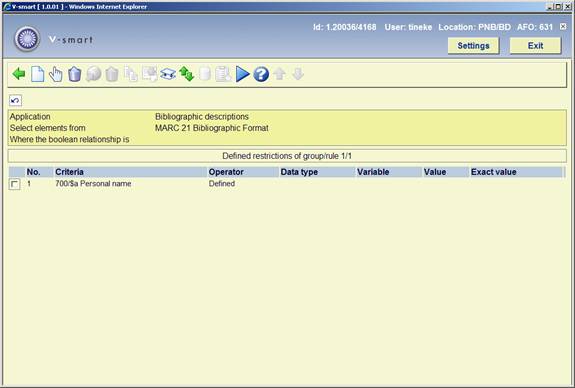
Options on the screen
: Choose the option to create new criteria. See section 631.2.3.1.
: Select a criterion and then this option to modify it. The same form as for new criteria is presented. See section 631.2.3.1.
:Select a criterion and then this option to delete it.
Note
Deleting a restriction can make the Boolean expression invalid. If this is the case, the system will show a warning and remove the Boolean expression. You will have to redefine a correct expression.
: This option is only relevant in AFO 141 and therefor not active here.
: This option is only relevant in AFO 141 and therefor not active here.
: This option is only relevant in AFO 141 and therefor not active here.
: This option is only relevant in AFO 141 and therefor not active here.
: If you do not add a Boolean relation to the profile, the system will automatically assume the Boolean relation to be “AND”. With this option you can set another Boolean relationship. See section 631.2.3.2.
: The system will show a form where you can specify the new (line) number of the selected restriction. After pressing the system will insert the restriction at the specified number. Any existing restriction with that number and all restrictions coming after the specified number will be automatically moved one number down.
: This option is only relevant in AFO 141 and therefor not active here.
: This option is only relevant in AFO 141 and therefor not active here.
: This option is only relevant in AFO 141 and therefor not active here.
Note
If a conversion profile is defined to add a subfield, e.g. 200/$b, then this subfield is added within a NEW 200 field if the rule has no restrictions.
If the rule has a restriction which is true (i.e adding 200$b, restriction is 200$a must be defined), then the new subfield is added into the same tag occurrence.
631.2.3.1 Add new criteria
: Choose the option to create new criteria. An input form is shown:

Fields on the screen
Selection criteria: Select a criterion from the list.
Operator: Select an operator from the list of available operators.
Data type: Select “String” or “Variable”.
Variable: Select a variable from the list of available variables.
Value: Type in a value. This can be any string.
Exact value: Indicate whether or not the Value has to be interpreted “exactly” (i.e. without any transformation) or “normalised” (i.e. transformed to uppercase).
The relationship between Variable and Value
If the Data Type “Variable” is selected, you can define both Variable and Value to achieve specific results. If you start Value with a plus (+) or a minus (-) sign, followed by a number, the system will add (+) or deduct (-) the number from the value of the Variable.
Example
If you define Variable as “Today” and Value as “+1”, the system will select the date of Today+1, which is tomorrow; if you define Variable as “1st January of Current Year” and Value as “-1”, the system will select the first day of the current year -1, which is the last day of the previous year.
631.2.3.2 Boolean relationships
: If you do not add a Boolean relation to the profile, the system will automatically assume the Boolean relation to be “AND”. You can change the Boolean relation by using one of the following syntaxes.
|
Syntax |
Boolean relation |
|
AND |
Boolean AND |
|
OR |
Boolean OR |
|
NOT |
Boolean NOT |
|
Complex |
See following section |
“Complex” Boolean relations are expressed using the AND, NOT and OR operators and digits that refer to the restrictions in the profile.
Note
The evaluation of the string is pure left to right evaluation and that brackets should be used for nesting. Blanks will be automatically removed from the Boolean expression. The Boolean operators are not case-sensitive.
Some examples
|
Example |
Comments |
Identical to |
|
1 OR 2 |
Criteria 1 OR Criteria 2 |
OR 1OR2 (1OR2) (1 OR 2) 1or2 |
|
(1 OR 2) AND 3 |
(Criteria 1 OR Criteria 2) AND Criteria 3 |
((1 OR 2) AND 3) (1OR2)AND3 (1 or 2) and 3 1 OR 2 AND 3 [Because the evaluation is pure left to right, brackets can be omitted in this case.] |
|
(1 NOT 3) OR 2 |
(Criteria 1 NOT Criteria 3) OR Criteria 2 |
1 NOT 3 OR 2 [Because the evaluation is pure left to right, brackets can be omitted in this case.] |
|
(1 OR 2) NOT (3 AND 4) |
(Criteria 1 OR Criteria 2) NOT (Criteria 3 AND Criteria 4) |
|
Not that the Boolean expression cannot start with a Boolean operator. The following expressions are invalid:
· NOT (1 AND 2)
· NOT 3 OR 4
If you do not include all criteria in the Boolean expression, the ones that are not in the expression are automatically added to the expression with an AND relation.
Example
If a profile contains three restriction criteria and a Boolean expression “2 or 3” the system will automatically add the first criteria to the expression, which results in “2 or 3 and 1”. However, we advise you to include all criteria in the Boolean expression to avoid confusion.
631.2.4 Add a rule to a group
: Select one or more rules from the 'general' group and click this button to add them to a (new) group. An input form will be displayed:
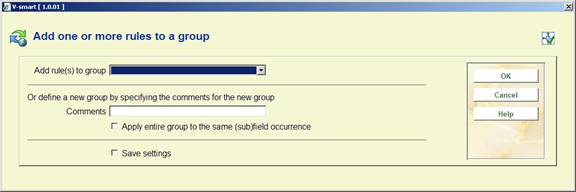
You can either select a group from the dropdown list or define a new group by entering data in the Comments field.
631.3 Conversion file maintenance
After choosing this option an overview screen is displayed:
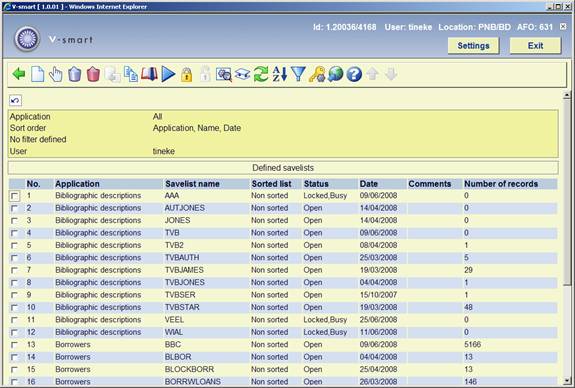
This option gives access to all options of save list management as if you selected through AFO 141->Save lists.
See the help on AFO 141 for more information about this screen and its options.
631.4 Conversion of files
Activating a global change process is a multi step process. The initial step of this process determines all following steps.
After selecting this option an input form is displayed:
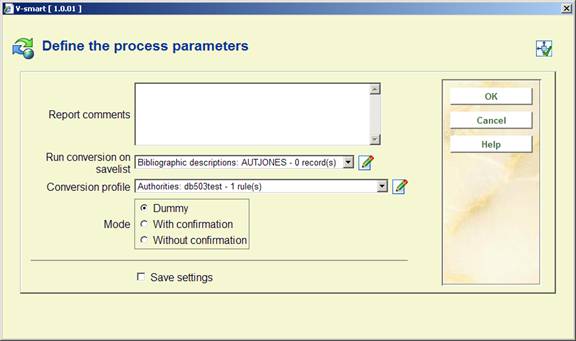
Fields on the screen
Report comments (optional): Type in comments for the report. The comments cannot consist of only punctuation characters and has a maximum length of 3000 characters. The comments can be used to better identify global change processes.
Save list: Select the save list that you want to apply the global change profile to.
Profile: Select the global change profile that you want to use.
Mode: Select in which “mode” you want to run the process. This is either “dummy" mode, “with confirmation" mode or “without confirmation" mode. Dummy mode implies that the system runs the process as a “dummy” process; no changes are made to the actual data files. With confirmation mode implies that the system will ask a confirmation for each record: each record will be displayed (with a “before” and “after” version of the record) and you have to confirm each change. Only if you confirm the change will it be applied to the actual data. Without confirmation mode implies that the process changes the actual data without asking for individual confirmations.
The further process, after you have clicked , depends on the run mode that you have selected.
If you have selected “Dummy" mode
The system switches to the general procedure for starting processes. You can now start the process in online, batch or memory mode.
If you have selected “Without confirmation" mode
The system shows a warning: “You are going to modify the records in save list XXX. This save list contains YYY records. Cancel this process if you have not tested it by running it in dummy mode or if you have not checked the result reports of the dummy conversion. Have you tested this process in dummy mode?”
The system shows an additional warning if the selected profile has not been used in "dummy" mode before which strongly advises the user to test the profile first using "dummy" mode.
The system switches to the general procedure for starting processes. You can now start the process in online, batch or memory mode.
If you have selected “With confirmation" mode
For each record in the save list the system shows the following form. Confirm if the system has to apply the change to the actual data, or Cancel if no change has to be made.
For each record in the save list the system shows a confirmation form.
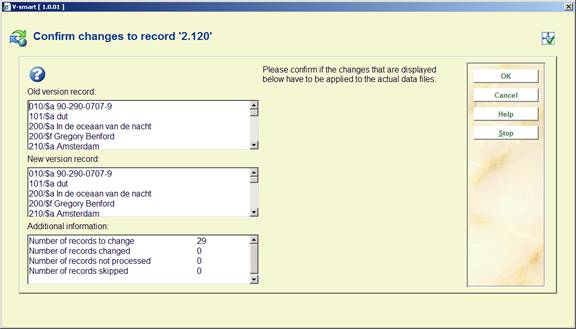
This confirmation form allows you to see the record before any change is done and the record as changed by the profile and allows you to confirm those changes or not and to stop processing the save list entirely.
None of these fields can be modified.
The form contains the following buttons:
· : the change is applied to the actual data
· : the system skips the record (the change is not applied to the actual data) and moves to the next record in the save list
· : stop the whole process
Note
Records in the save list are skipped automatically if none of the rules apply.
At the end of the process (this is either if the end of the save list is reached or if the process is stopped by the user), the system displays the summary Totals.
If the system encounters a software problem during the global change process it should:
· return the record to the state before processing of the record was started (not necessary if the process was started in "Dummy" mode)
· log the record in the appropriate error category of the report of the global change task
· continue with processing the next record from the save list.
631.5 Conversion reports
The system displays the reports of all global change tasks that have been processed by the system, in reverse chronological order (i.e. the most recent one is at the top of the list):
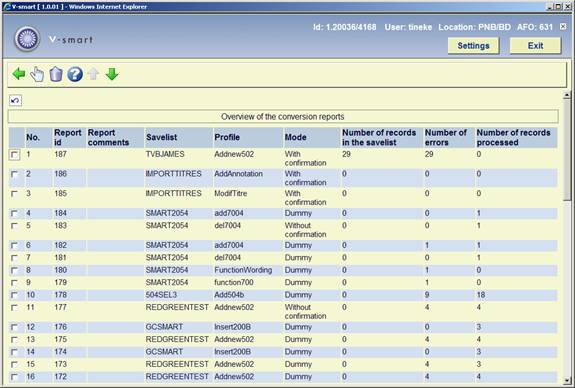
Columns on the screen
Report id: This is a number that is automatically handed out by the system.
Report comments: The description given to the report.
Save list: The savelist against which the process task was performed.
Profile: The profile used to perform the task.
Mode: The global change mode used.
Number of records in the save list.
Number of errors: This can be higher than the number of records in the save list as the same error can appear multiple times in the same record.
Number of records processed: This can be lower than the number of records in the save list if the conversion is run in "With confirmation" mode and if the process is terminated by the user before the end of the save list is reached.
If the execution of the task was halted due to the fact that there were too many errors reported by the task the system will show a warning icon in front of the task.
Options on the screen
: Select a report and then this option to view the details. See section 631.5.1 for more details about this screen.
: Select a report and then this option to delete it. The system asks for a confirmation.
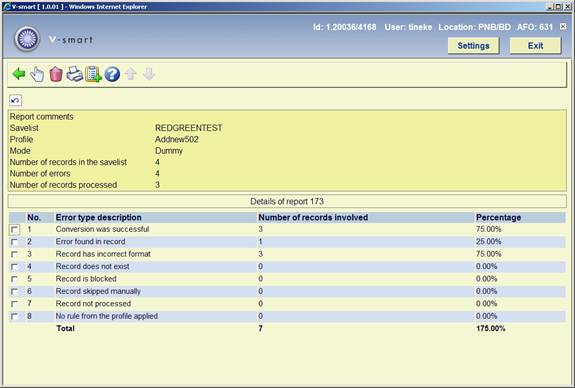
631.5.1 View report details
The system displays a select list that contains an overview of all error types that appear in the report. At the top of the screen the system displays (in a bordered window) the same data elements that are shown on the overview screen of reports: task wording, save list, profile, global change mode, number of records in the save list, number of errors, number of records processed).
The select list displays the error type description, the number of records involved and the percentage in relation to the total number of records in the save list. [Please note that the total can be higher than 100% as the same record can be attached to multiple error types.]
The error types that are shown depend on the file type (application) that was processed (bibliographic, authority or borrower). On top of these file specific errors, the system shows the following information in the report:
· Conversion was successful
· Error encountered in record
·
Record has incorrect format
[as in not the same format as the profile uses; only for authorities and bibliographic records. Also indicates that the record had format errors when filed]
· Record does not exist
· Record is blocked
·
Records skipped manually
[if a process is run in "With confirmation" mode]
·
Records not processed
[if a process in "With confirmation" mode is cancelled]
· No rule from the profile applied
The total is mentioned at the bottom of the error list.
Options on the screen
: If you select an error type, the system displays a select list that contains the records that are attached to the selected error type. See section 631.5.1.1 for more details.
: Select a report and then this option to delete it. The system asks for a confirmation.
: The system switches to the standard dialog for generating output.
: The system asks in which save list the records have to be stored. This can be an existing save list, but you can also create a new save list.
631.5.1.1 Select an error type
: If you select an error type, the system displays a select list that contains the records that are attached to the selected error type.
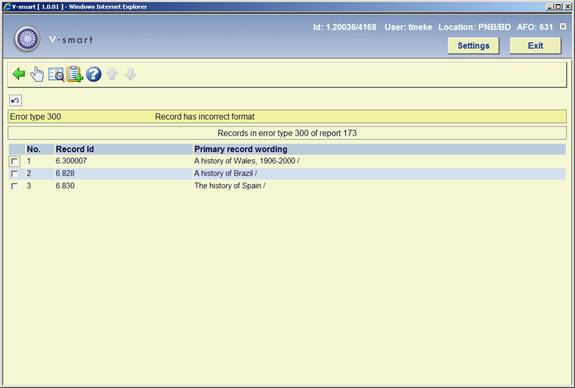
Multiple detail lines can exist for a single record as the same error can occur multiple times in the same record.
Options on the screen
: The old and new version of the record will be displayed in a pop-up screen.
to get access to the regular record overview screen (of bibliographic, authority or borrower maintenance, i.e. AFO 111, 113 or 431)
: to store the records in a save list